Command Reference
See the latest version. This site is no longer maintained.
See the latest version for up-to-date documentation. Docs have been completely reworked and moved to a new location. The new site is more user-friendly and searchable. It's also easier for the developers to work with.
Bus Pirate 5 REV6
Firmware v0.1 (unknown), Bootloader N/A
RP2040 with 264KB RAM, 16MB FLASH
S/N: 2509449B952069E4
https://DangerousPrototypes.com/
Flash Storage: 0.10GB (FAT16)
Configuration file: Loaded
Available modes: HiZ UART I2C SPI LED DUMMY1
Active mode: HiZ ()=()
Display format: Auto
HiZ>
This guide is updated with to reflect feature changes with each firmware release. To check your firmware version type i followed by enter in the Bus Pirate terminal window. Here, the Bus Pirate is running firmware v0.1.
It's always best to use the latest firmware, especially in these early days of a new design. There will be continuous improvements and new features. See the upgrade guide for the simple drag and drop bootload process.
User terminal
The Bus Pirate is accessed from a command line in a serial terminal. Use your terminal of choice. On Windows we like the latest version of Tera Term.
Talk to the Bus Pirate from a serial terminal of your choice set to 115200bps, 8/N/1. The serial port is emulated over USB, so higher bitrate (bps) settings will also work with no extra configuration. If the user interface feels slow, check that the speed is at least 115200bps.
VT100 terminal emulation
Press enter to show the command prompt if your terminal is blank.
If the Bus Pirate has just restarted you will be prompted to choose the terminal emulation mode.
- VT100 mode - Supports color and a live view statusbar at the bottom of the terminal. This should be your first choice unless you specifically need the legacy ASCII mode.
- ASCII mode - Legacy monochrome text only mode.
If you choose VT100 mode and see lots of garbage characters in the terminal, check that your terminal emulator has VT100 support and that VT100 support is enabled.
Your terminal mode choice will be saved and automatically loaded the next time the Bus Pirate is connected. Just press enter to start the command prompt.
The terminal mode can be changed from the configuration menu. Open the configuration menu with the c command followed by enter.
If you're stuck in a terminal mode that's not working, press and hold the Bus Pirate button and then plug in the USB cable. The Bus Pirate will start without loading any saved settings.
You can also navigate to the Bus Pirate USB disk, delete the bpconfig.bp file and restart the Bus Pirate. You will be prompted to choose VT100 or ASCII mode after restarting.
Command line
The Bus Pirate has a simple Linux-like command line interface. Enter a command followed by optional parameters and then press enter.
The Bus Pirate always starts in high impedance mode (HiZ), a safe mode with all outputs disabled. HiZ mode intends to protect any connected devices from conditions beyond their specifications. From the HiZ prompt, a bus mode can be selected to use a specific protocol.
Terminal control
| Keyboard Key | Action |
|---|---|
left arrow | Moves the cursor left one character |
right arrow | Moves the cursor right one character |
up arrow | Copies the previous command in the command history buffer to the command line |
down arrow | Copies the next command in the command history buffer to the command line |
home | Moves the cursor to the beginning of the line |
end | Moves the cursor to the end of the line |
backspace | Erases the character to the left of the cursor and moves the cursor left one character |
delete | Erases the character under (or to the right of) the cursor and moves the cursor left one character |
Bus Pirate 5 understands some common control keys.
Default options
I2C speed
1KHz to 1000KHz
x. Exit
KHz (400KHz*) >
Data bits
1. 8*
2. 10
x. Exit
Bits (1) >
Mode: I2C
I2C>
Most configuration and option prompts have a default value shown in ( ) and the option to exit without changes.
- Press
enterto select the default option. - Press
xfollowed byenterto exit a menu without changes.
Saved options
Use previous settings?
I2C speed: 400KHz
Data bits: 8
y/n> y
Mode: I2C
I2C>
Many options will be saved to flash storage. You will be prompted to reloaded previous settings the next time.
Disk Commands
Several Linux-like disk commands can be used to navigate the Bus Pirate flash storage.
ls List directory contents
DIR System Volume Information
81 bpspi.bp
256 test.txt
333 bpconfig.bp
35 bpi2c.bp
31 bpled.bp
256 sample.txt
1 dirs, 6 files.
HiZ>
List the contents of the current directory in flash storage. Type ls followed by enter. ls followed by a directory name lists the contents of that directory.
mkdir Make directory
HiZ>
Make a directory in the current location in the flash storage. Type mkdir followed by a directory name and then enter.
cd Change directory
/test
HiZ> ls
0 dirs, 0 files.
HiZ>
Change directory. Type cd followed by a directory name and then enter.
rm Remove file or directory
HiZ>
Remove file or directory (if empty). Type rm followed by the name of a file or empty directory, then hit enter.
cat Print file contents
Bus Pirate 5 can program and dump EEPROM, flash and other memory chips directly to the flash storage! No need for external software on your computer. No need to install toolchains and compile scripts. What you need, where you need it. Bus Pirate 5 is here! --EOM
HiZ>
Print the contents of a file. Type cat followed by a file name, then hit enter.
Configuration
?/h/H Help menu with latest options
Type ? followed by enter to display a help screen with all available menu and syntax options in the current firmware.
i Version information
Bus Pirate 5 REV6
Firmware v8 (unknown), Bootloader N/A
RP2040 with 264KB RAM, 16MB FLASH
S/N: 2509449B952069E4
https://DangerousPrototypes.com/
Flash Storage: 0.10GB (FAT16 File System)
Configuration file: Loaded
Available modes: HiZ UART I2C SPI LED DUMMY1
Active mode: HiZ ()=()
Display format: Auto
HiZ>
Type i followed by enter to see the hardware, firmware, and microcontroller version.
Display format: Auto
Data format: 8 bits, MSB bitorder
Pull-up resistors: ON
Power supply: ON (3.3V/3.3V)
Current limit: OK (8.0mA/50.0mA)
Frequency generators: OFF
If a bus mode is configured additional information about the configuration is printed.
c Configuration options menu
Configuration options
1. Language
2. ANSI color mode
3. ANSI toolbar mode
4. LCD screensaver
5. LED effect
6. LED color
7. LED brightness
x. Exit
> 1
Language
1. English
2. Chinese (simplified)
x. Exit
> 1
Language set to English
Configuration options
1. Language
2. ANSI color mode
3. ANSI toolbar mode
4. LCD screensaver
5. LED effect
6. LED color
7. LED brightness
x. Exit
> x
Configuration file: Saved
I2C>
Type c followed by enter to show the configuration menu.
Press x followed by enter to exist the configuration menus and save the current settings to flash storage.
m Set bus mode
Mode selection
1. HiZ
2. UART
3. I2C
4. SPI
5. LED
6. DUMMY1
x. Exit
Mode > 1
Mode: HiZ
HiZ>
Type m followed by enter to select a bus mode. HiZ is a safe mode with all pins set to high-impedance and all peripherals disabled.
l/L Set MSB/LSB first
Bitorder: MSB 0b10000000
HiZ> L
Bitorder: LSB 0b00000001
HiZ>
The l/L commands determines the bit order for reading and writing bytes.
The current bit order configuration is displayed on the extended information screen using the i command while in a mode other than HiZ.
o Data output display format
Number display format
Current setting: Auto
1. Auto
2. HEX
3. DEC
4. BIN
5. ASCII
x. Exit
Mode > 1
Mode: Auto
HiZ>
The Bus Pirate can display values as hexadecimal, decimal, binary and a raw ASCII byte. Change the setting in the data display format menu (o). The default display format is Auto.
- Auto display mode attempts to mirror user input formatting. Each value is displayed in the HEX/DEC/BIN format entered.
- RAW display mode sends data to the terminal as raw bytes without any text conversion. This is useful for talking to ASCII serial interfaces that don't need further conversion.
d Display mode
Display selection
1. Default
2. Scope
x. Exit
Display > 2
Display: Scope
d selects the LCD display mode.
- Default: Pin labels and voltage
- Scope: Oscilloscope mode
~ Self-test
SELF TEST STARTING
DISABLE IRQ: OK
ADC SUBSYSTEM: VUSB 5.08V OK
DAC READ/WRITE: OK
FLASH STORAGE: OK
PSU ENABLE: OK
BIO FLOAT TEST (SHOULD BE 0/0.2V)
BIO0 FLOAT: 0/0.04V OK
BIO1 FLOAT: 0/0.04V OK
BIO2 FLOAT: 0/0.04V OK
BIO3 FLOAT: 0/0.04V OK
BIO4 FLOAT: 0/0.04V OK
BIO5 FLOAT: 0/0.04V OK
BIO6 FLOAT: 0/0.04V OK
BIO7 FLOAT: 0/0.04V OK
BIO HIGH TEST (SHOULD BE >3.0V)
Perform a factory self-test. The Bus Pirate is capable of twiddling pins and checking for hardware faults. See the Bus Pirate self-test guide for a complete list of tests and the problems they detect.
# Reset
VT100 compatible color mode? (Y/n)>
Reset the Bus Pirate.
Depending on your serial terminal software you may need to reconnect to the Bus Pirate serial port. The latest versions of many terminal emulators, such as Tera Term, reconnect automatically.
$ Jump to bootloader
Activate the Bus Pirate bootloader for firmware updates. The bootloader appears as a USB disk drive connected to your computer. Drag a .uf2 firmware file into the disk. After an update the Bus Pirate resets.
If the firmware update is interrupted and you find yourself locked out of the Bus Pirate terminal don't panic. Use the 2mm HEX key included with Bus Pirate 5 (or a paperclip) to press and hold the bootloader button on the bottom of the board. Plug in the USB cable while holding the button down. The bootloader with connect and you can try the update again. The bootloader is frozen in hardware and cannot be corrupted or overwritten.
Utilities
w/W Power supply (off/ON)
Power supply
Volts (0.80V-5.00V)
x to exit (3.30) > 2.1
2.10V requested, closest value: 2.10V
Set current limit?
y
Maximum current (0mA-500mA)
x to exit (100.00) > 50
50.0mA requested, closest value: 50.0mA
Power supply:Enabled
Vreg output: 2.1V, Vref/Vout pin: 2.1V, Current sense: 7.3mA
I2C>
Bus Pirate 5 has a single 'Programmable Power Supply Unit' (PPSU) with several handy features:
- 1-5volts adjustable output
- 0-500mA current sense
- 0-500mA current limit with digital fuse
- One-way valve to protect the PPSU when an external voltage is applied to the VREF/VOUT pin
Uppercase W enables the onboard power supply unit. You will be prompted for the output voltage and an optional current limit.
Check the voltage and current in the live view statusbar if active, or show the power supply voltage report using the v command.
400mA is the rated maximum of the PPSU, but we added some headroom in the current limit to account for current spikes.
The PPSU is capable of 0.8 to 5volts output. However, the maximum working range is limited to 1-5volts because of the Vgs of the P-channel MOSFET used in the one-way valve. Many will be capable of the full range, but some may not. The Bus Pirate 5 IO buffers are only rated to 1.65volts, so in practice this isn't an issue over the specified working range.
When the programmed current limit is exceeded the PPSU hardware fuse disables the power supply. The terminal colors invert repeatedly, an alarm bell will sound, an error message is shown and command execution is halted. Use the W command to restart the PPSU again.
Power supply: Disabled
SPI>
Lowercase w disables the PPSU.
v/V Power supply voltage report

The voltage report shows the current state of all the Bus Pirate pins and peripherals. This is a duplicate of the information shown on the live view statusbar.
- The first line is the pin number and probe color. The colors also match the Bus Pirate LCD and the live view statusbar.
- The second line is the pin function.
- The third line shows the voltage measured on each pin.
Lowercase v displays a one time voltage measurement. Uppercase V displays a continuously updated voltage measurement, press any key to exit.
p/P Pull-up resistors
Pull-up resistors: Enabled (10Kohms @ 3.3V)
I2C> p
Pull-up resistors: Disabled
I2C>
p and P toggle the pull-up resistors off and on. Pull-up resistors are generally used with open collector/open drain bus types such as 1-Wire and I2C.
The onboard pull-up resistors are powered through the VREF/VOUT pin of the IO header, either by the onboard power supply or an external voltage applied to the VREF/VOUT pin.
A warning is displayed if there's no voltage on the VREF/VOUT pin. Check the voltage report v and verify that a voltage is present on VOUT/VREF.
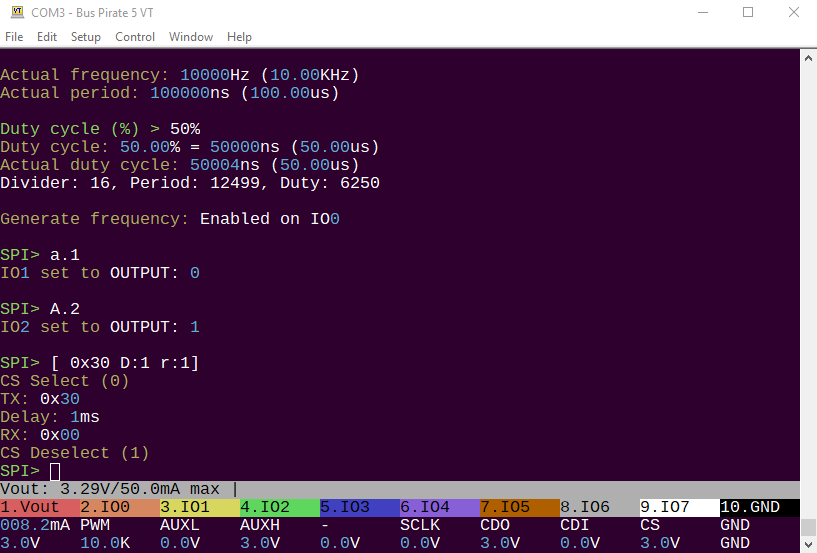
g/G Frequency generator
Generate frequency
Choose available pin:
0. IO0
1. IO1
2. IO2
3. IO3
4. IO4
5. IO5
6. IO6
7. IO7
x. Exit
> 0
Period or frequency (ns, us, ms, Hz, KHz or Mhz) > 12.4KHz
Frequency: 12.400KHz = 12400Hz (12.40KHz)
Period: 80645ns (80.65us)
Actual frequency: 12401Hz (12.40KHz)
Actual period: 80640ns (80.64us)
Duty cycle (%) > 35%
Duty cycle: 35.00% = 28224ns (28.22us)
Actual duty cycle: 28227ns (28.23us)
Divider: 16, Period: 10079, Duty: 3528
Generate frequency: Enabled on IO0
LED-()>
Uppercase G displays the frequency generation menu. Choose an available pin and enter the period or frequency, including the units (ns, us, ms, Hz, KHz or Mhz). Enter a duty cycle as a percent, don't forget the %. The Bus Pirate will find the closest match and generate a frequency on the pin.

The frequency generator will be displayed in the live view statusbar and on the LCD with the label PWM.
Generate frequency: Disabled on IO0
LED-()>
To stop the frequency generator on a single pin, use the lowercase g.X command where X is the pin number.
Generate frequency: Disabled on IO0
LED-()>
To stop frequency generation on all pins, use the lowercase g command without specifying a pin.
Not all pins will be available due to the PWM structure of the RP2040, and adjacent pairs must share the same frequency. There is also an issue with the PPSU using a PWM slice. This should all be solvable with the PIO, but for now the Bus Pirate will warn you about the limitations.
f/F Measure frequency
Frequency measurement
Choose available pin:
1. IO1
3. IO3
5. IO5
7. IO7
x. Exit
> 7
Frequency measurement: Enabled on IO7
Frequency IO7: 12.40KHz 80.65us (12400Hz), Duty cycle: 35.0%
LED-()>
F displays the frequency measurement menu. Choose one of the available pins.
The frequency will be measured continuously and displayed in the live view statusbar and LCD with the label FREQ.
Frequency IO7: 12.40KHz 80.65us (12400Hz), Duty cycle: 35.0%
LED-()>
Lowercase f X measures the frequency and duty cycle on pin X once.
Press any key to exit
Frequency IO7: 12.40KHz 80.65us (12400Hz), Duty cycle: 35.0%
Uppercase F X continuously measures the frequency and duty cycle on pin X. Press any key to exit.
IO6 has no frequency measurement hardware!
Freq. measure is currently only possible on odd pins (1,3,5,7).
In the future we will fix this using the RP2040 PIO.
Only half of the RP2040 pins support frequency measurement. The Bus Pirate will warn you if hardware isn't available. To see which pins are currently available use the F command.
Not all pins will be available due to the PWM structure of the RP2040, and adjacent pairs share the same PWM slice. There is also an issue with the PPSU using a PWM slice. This should all be solvable with the PIO, but for now the Bus Pirate will warn you about the limitations.
=X Convert X to HEX/DEC/BIN number format
=0x06 =6 =0b00000110
I2C> = 0x6
=0x06 =6 =0b00000110
I2C> = 6
=0x06 =6 =0b00000110
I2C>
Type = and enter a value to see the HEX/DEC/BIN equivalent. Base conversion command, available in all modes.
To change the Bus Pirate output display format see the o command.
| X Reverse bits in byte X
|0x0F000000.32|0001700000000.32|0b00001111000000000000000000000000.32
I2C>
Reverse bit order in byte X. Displays the HEX/DEC/BIN value of the reversed byte.
To change the Bus Pirate read/write bit order see the l/L command.
a/A/@ Auxiliary pin control (low/HIGH/read)
IO1 set to OUTPUT: 0
UART> A 1
IO1 set to OUTPUT: 1
UART> @ 1
IO1 set to INPUT: 0
UART>
Sometimes it's useful to control a pin directly from the user terminal.
a X, A X and @ X set pin X low, high and input (HiZ). The @ command also reads and reports the pin state.
Commands a/A/@ are followed by a space and the pin number to control. This is different than syntax a/A/@ which use the a.X notation.
Pins already assigned a function cannot be changed with the a/A/@ commands. The Bus Pirate will report an error.
Macros
Macros perform complex actions, like scanning for I2C addresses,
interrogating a smart card or probing a JTAG chain. Macros are numbers
entered inside ( ). Macro (0) always displays a list of macros available in the current bus mode.
(0) List mode macros
1. I2C Address search
I2C>
Macro (0) always displays a list of macros available in the current bus mode.
(#) Run macro
I2C Bus Scan
0 1 2 3 4 5 6 7 8 9 A B C D E F
00 . . . . . . . . . . . . . . . .
10 . . . . . . . . . . . . . . . .
20 . . . . . . . . . . . . . . . .
30 . . . . . . . . . . . . . . . .
40 . . . . . . . . . . . . . . . .
50 . . . . . . . . . . . . . . . .
60 . . . . . . . . . . . . . . . .
70 . . . . . . . . . . . . . . . .
Done.
I2C>
Execute a macro by typing the macro number between ( ).